Showing posts with label Coffee. Show all posts

Sunday, October 13, 2024

Coffee Word Art

 Our members created fun & gorgeous Coffee Word Art for the Tag Survivor game in our forum.

Thank you Barb, Bobbie, Pammers, Sandy & Suzie!

Word Art is in PNG format.

Just right click and save.


Saturday, May 13, 2023

Mixed Theme Cluster Frames

 Our members made some beautiful Mixed Cluster Frames to share.

Thank you Louise, Sandy & Shelly!

They used the following kits: 

Dear Mom by Scraps Dimension
Emerald by MizTeeque
May Showers Blog train by Crazy Cat Creations, Digiscrap Angelhaze, Miggins & Savage Dezines
Mother's Garden by Manipulated by Magik

SYHO May 2021 Blog train by Miggins & Mythical
SYHO May 2022 Blog train by Miggins & Mythical
SYHO May Blossom blog train by Digicats (and Dogs), Miggins & Mythical

Frames are in PSD format

Previews are in JPG format

Click on the download link below the preview.

Please leave some Passion if you download! 


Saturday, September 25, 2021

Coffee Time Exclusive Tutorial by Penny at Venomous Cherries Creations


This tutorial was written by Venomous Cherries Creations on September 15, 2021 exclusively for Artistic Tag Passions blog.
 It was written using PSPX but can easily be done in any photo program.
Please do not copy/post on any other site, claim as your own, or rip apart.
If you would like to use it in a forum/group challenge, please link to the ATP blog.
 This tutorial uses methods/ideas I have gained through the years from various sources.
Any resemblance to others is coincidental and accidental.
Thanks for trying the tutorial and I would love to see anything you make from it. venomouscreations1@gmail.com

Supplies:
 
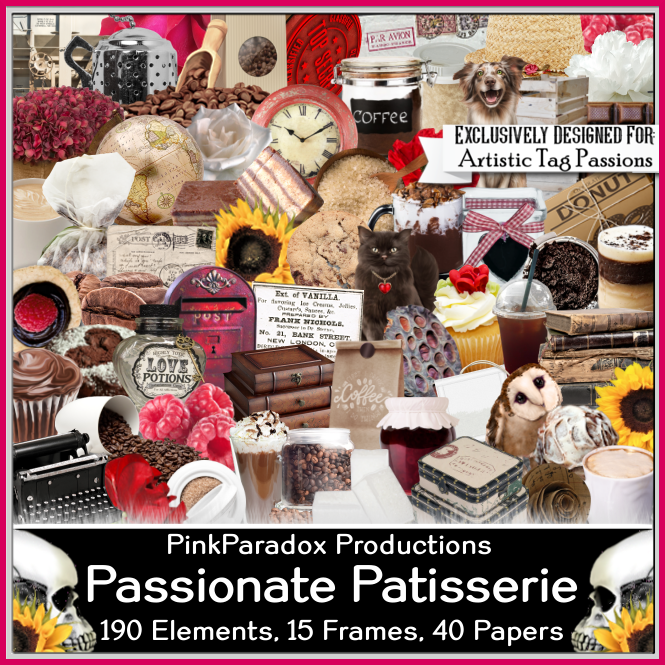
""Passionate Patisserie" kit by PinkParadox Productions_this kit was made exclusively for Artistic Tag Passions forum and can only be obtained thru the group
Mask Of Choice
 
Filters:
Filters Unlimited 2_Photo Aging Kit
 
 
Fonts:
Mabussa
 
Abbreviations:
DS_Drop Shadow
ANL_Add NEw LAyer
EC_Eye Candy
GG_Gradient Glow
AS_Animation Shop
A/P_Copy and Paste
FF_Flood Fill
Ctrl+A_Select All
Ctrl+C_Copy
Ctrl+V_Paste
Ctrl+D_De-Select
Ctrl+E_Paste Into Selected Frame/s
 
Let's tag!
Open blank 650 x 650 image
ANL
Ctrl+A
Copy/Paste Paper 35 into selection
Ctrl+D
Apply Mask
Open Element 186
Move towards top of the mask area, placing the main part you want showing
within the mask
Apply same mask again
Repeat apply mask
Place this mask layer towards top right of bottom mask layer as shown
Copy/Paste the following elements, duplicating, mirroring, flipping, sharpening as needed:
12
18
19
20
22
23
28
62
77
111
112
123_Rotate Right slightly
154
155
171_Place directly above Element 123
Duplicate_Mirror_Flip
Place on Right side directly above Element 23
176_Rotate 90 Right_Mirror_Place on the Left as shown
Duplicate
Mirror_Rotate 90 Right_Place on the bottom Right as shown
182
Frame 1
Frame 16_Place directly on top of Element 20 as shown
Magic Wand_Select the inside opening_Expand by 3
ANL beneath frame
FF White
FU2_Photo Aging Kit_Hairs & Dust_128_128
Effects_Photo Effects_Sepia Toning_56
Copy/Paste Element 108
Re-size so it fits nicely inside frame
Invert_Delete_Ctrl+D
Sharpen each element
DS all elements_0_0_75_15_Black
Add all correct copyright information
Name_Mabussa_72_Black
DS_1_2_100_5_Black
Save as png and enjoy!


Saturday, June 12, 2021

Coffee Exclusive Tutorial by Penny at Venomous Cherries Creations


Coffee
 
This tutorial was written by Venomous Cherries Creations on June 08, 2021 exclusively for Artistic Tag Passions blog.
 It was written using PSPX but can easily be done in any
photo program. Please do not copy/post on any other site, claim as your own, or rip apart.
If you would like to use it in a forum/group challenge, please link to the ATP blog.
This tutorial uses methods/ideas I have gained through the years from various sources.
Any resemblance to others is coincidental and accidental.
Thanks for trying the tutorial and I would love to see anything you make from it. venomouscreations1@gmail.com
 
Supplies:

Tube 49-1 by Anna Marine currently available at CDO
"Passionate Patisserie" kit by Pink Paradox Productions 
This kit was made exclusively for Artistic Tag Passions forum and is only available through the group.
Photo Frame of choice...Sorry, the one I used was obtained thru a group
challenge and is not shareable but any photo frame will work 
 
Filters:
No outside filters used
 
Fonts:
MitreSquare
 
Abbreviations:
DS_Drop Shadow
ANL_Add NEw LAyer
EC_Eye Candy
GG_Gradient Glow
AS_Animation Shop
A/P_Copy and Paste
FF_Flood Fill
Ctrl+A_Select All
Ctrl+C_Copy
Ctrl+V_Paste
Ctrl+D_De-Select
Ctrl+E_Paste Into Selected Frame/s
 
Let's tag!
 
Open a blank 700x700 canvas
ANL
Ctrl+A
Copy/Paste into selection paper 35
Ctrl+D
Apply mask
Enlarge slightly and move to the left
C/P photo frame
Select photo area
Expand by 1
C/P tube close up positioning as you like
Promote selection to layer
Crl+D
Blend mode of tube_Luminance (L)
Opacity_55
Merge tube and photo frame
Now, you can either duplicate, mirror, re-size this completed photo frame
or C/P photo frame again, repeat steps using a different area of the tube. Choice is yours.
Using the Pick tool (K), rotate the frames slightly
Place as shown
C/P tube placing as shown
C/P the following elements, duplicating, mirroring, sharpening, and place as shown:
(13)
(20)
(22)
(31)
(62)
(125)...rotate this piece, placing along top edge of photo frame
Using the selection tool, point to point, select the corners and delete
(this step may not be necessary depending on the photo frame you use. 
Mine had tape and I wanted the sign to appear to be under the tape.)
(129)
(154)
(155)
(182)
(186)
DS everything but mask: 0_5_50_10_Black
Add all correct copyright/license information
Name_ MitreSquare_size 55_White
Repeat DS
Save and enjoy!!

Monday, May 17, 2021

Passionate Perissil Exclusive Tutorial by Pammers at Pammers Passions


Scrapkit - Passionate Patisserie by PPP - Exclusive kit to ATP Forum

Template - Becky #282 -(bundle 281-290) HERE
Tube - VMT -HERE

~~~~~~~~~~~~~~~~~~
Open template, delete copyright and floral stem
Image/canvas size/800x800
Remember to DS as you go and I always start at bottom and work my way up
Shape 5 - p19
E168 - resize 70%
Shape 4 - p16
Shape 3 - p7
Shape 2 - flood fill with color of choice
Effects/texture/blinds at default
Shape 1 - p15
Frame fill - p30 (resize paper by 50%)
Crop
Image/canvas size/800x800
Click top layer
Position tube
E187 - resize 50%
E186 - resize 70%
E167 - resize 60%/image/mirror
E159 - resize 60%
E31 - resize 60%
E44 - resize 45%
E32 - resize 45%
E62 - resize 35%
E61 - resize 30%
E34 - resize 50%
Crop/merge visible/resize as needed/add proper copyright

Monday, May 10, 2021

Passionate Patisserie Exclusive Tutorial by Shaz at 3Tz's DesignZ


This tut was written May 7th, 2021 for those with a basic knowledge of psp.

I am using the awesome artwork of  Cuddly Rigor mortis
The tube is called "127-3" 
You need a license to use this tube, do not use without a license.
You can find this tube at CDO store  HERE


I used PSPX6...but any of them should work.

Exclusive kit Passionate  Patisserie, by PPP, this kit is awesome. 
This kit is an Exclusive at ATP, you will have to join to be able to get the kit.
Artistic Tag Passions Forum HERE

Artistic Tag Passions Blog HERE
DFly Mask 030 HERE 
Check out the rest of the blog HERE

Font of choice,  I used betterfly

Drop shadow is  V -1 H -5, 50, 10, or use what you prefer.
Let's get started


*Remember to add your drop shadow as you go along*

Open a new image 800 x 800 or a size you prefer, can always resize later.
Paste paper 41, apply your mask, delete, merge group.


Resize your tube to 50%, paste.

Resize element 20 to 40%, paste on the left below the tube.
Resize element 22 to 35%, paste below the tube on the right.
Resize element 107 to 55%, paste on the left behind the tube.
Resize element 73 to 40%, paste on the right behind the tube.

Resize element 30 to 30%, paste at the bottom above the tube.
Resize element 15 to 20%, paste at the bottom above the scoop of power.
Resize element 35 to 30%, paste at the bottom to the right more.

Resize element 36 to 30%, paste below the cup on the right.
Resize element 23 to 30%, paste above the milk bottle.
Resize element 31 to 35%, paste on the left above the tube.

Resize element 12 to 25%, paste on the left behind the scoop of coffee beans.
Resize element 13 to 30%, paste behind the cup you just pasted.
Resize element 160 to 20%, paste at the bottom right, duplicate, 
move to the left.

Resize element 25 to 20%, paste at the bottom on the left below the flower layer.
Resize element 24 to 50%, paste on the right above the clock layer.
Resize element 61 to 20%, paste on the left below the coffee beans.
Resize element 27 to 25%, paste at the bottom below the cup with the beans.
Resize element 182 to 50%, mirror, paste on the left above the donut sign.

Resize element 69 to 10%, paste at the bottom being on the top layer, duplicate,
move over a little.
Resize element 65 to 12%, paste by the beans.
Resize element 129 to 30%, paste behind the tube behind the legs.

Add any other elements that you would like, make it your own.
Always readjust your mask and elements how you like them before you
 merge your tag, resize, sharpen.

Then add your copyright and name.
That's it
Hope you enjoyed doing my tut.